Design Inspiration | Published October 8, 2025
Kitchen Island Design Ideas for Large Luxury Homes [2026 Inspiration Guide]
Transform your kitchen with stunning island designs. Explore 30+ ideas for large luxury homes, from multi-level islands to waterfall edges and chef-worthy workstations.
The kitchen island has evolved from a simple prep surface to the absolute heart of luxury home design. In California's high-end kitchens, we're designing islands that are 10, 12, even 14 feet long—multi-functional command centers that handle everything from meal prep to homework to cocktail parties.
After designing hundreds of custom islands for homes across California—from Atherton estates to Malibu beach houses—I can tell you that the right island design completely transforms how you use your kitchen. Let's explore what's possible when you have the space and budget to create something truly exceptional.
Getting the Dimensions Right
The Foundation: Size and Proportion
Before we dive into specific design ideas, let's talk about the practical foundation. A luxury island needs to be sized appropriately for the space—not too small to feel insignificant, not so large it overwhelms.
Island Sizing Guidelines for Luxury Homes
Standard Luxury Island
8-10 feet long × 4 feet deep
Perfect for most 400-600 sq ft kitchens. Provides ample workspace, seating for 4-5, and room for appliances or storage.
Oversized Luxury Island
10-14 feet long × 4-5 feet deep
For 600-900 sq ft kitchens. Multiple work zones, seating for 6-8, space for double sinks, cooktop, and extensive storage.
Grand Estate Island
14-20+ feet long × 5-6 feet deep
For 900+ sq ft kitchens in estates. Essentially two islands connected, or one massive piece that serves as the kitchen's centerpiece.
Critical Clearances (Don't Skip These)
- • Minimum 42" clearance on all sides for comfortable movement
- • 48-54" clearance if you want two people to pass comfortably
- • 60" clearance behind seated guests (so people can walk behind them)
- • 36" minimum overhang for comfortable seating at bar height
- • 42-48" ideal overhang for comfortable dining-style seating
The Most Popular Luxury Island Feature
Multi-Level Islands: Adding Dimension
Multi-level islands have become the signature of luxury kitchen design. They create visual interest, define distinct zones, and solve practical problems elegantly.
Two-Tier Island: The Classic
The most common luxury configuration: lower surface (36" height) for food prep and cooking, raised bar (42" height) for dining and hiding kitchen mess from view.
Perfect For:
- • Hiding sink and prep mess from dining/living areas
- • Creating distinct work vs. social zones
- • Accommodating both standard and bar-height seating
- • Adding visual interest without being too dramatic
Design Considerations:
- • Raised section should be 12-18" deep minimum for comfortable dining
- • Can be same material or contrasting (marble raised bar, wood prep surface)
- • Consider where the level change happens—middle, back, or wrapped around
Three-Tier Island: Maximum Drama
Three distinct levels create a sculptural element in the kitchen. Typically: standard prep height (36"), dining counter (30" table height), and bar height (42").
Perfect For:
- • Very large kitchens (800+ sq ft) where scale requires drama
- • Creating multiple distinct zones (prep, casual dining, entertaining)
- • Accommodating different seating preferences (kids at lower level, adults at bar)
- • Making an architectural statement
Recent Project Example:
Atherton estate, 16-foot island: 36" prep surface with sink and cooktop, 30" dining height for family breakfast (seats 4), 42" bar for cocktails and entertaining (seats 3). Each level in a different material—absolute showstopper.
Stepped Island: Subtle Elevation
Instead of distinct levels, the island surface gradually steps up or down. Creates visual interest without sharp transitions.
Perfect For:
- • Modern/contemporary aesthetics where clean lines are paramount
- • Creating subtle zoning without visual interruption
- • Highlighting beautiful stone with changing thicknesses
- • Spaces where dramatic level changes would feel too busy
The Most Instagram-Worthy Design Choice
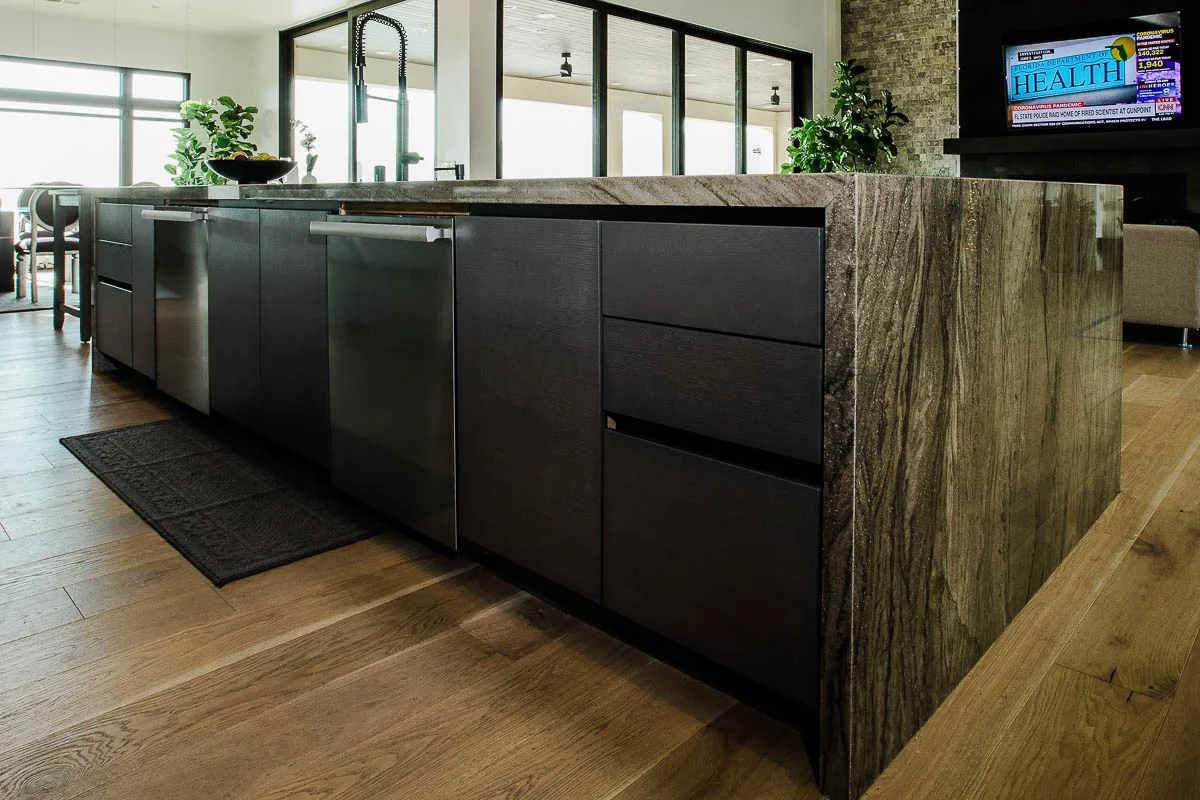
Waterfall Edge Islands: Modern Elegance
Waterfall edges—where the countertop material continues down the sides to the floor—have become synonymous with luxury modern kitchens. And for good reason: they're stunning.
Full Waterfall: Both Sides
Countertop material flows down both ends of the island, creating a continuous, monolithic look. Most dramatic option but also most expensive.
Cost Reality Check:
- • Adds $3,000-8,000 to island cost (depending on material)
- • Bookmatched stone (where grain mirrors on both sides) adds $2,000-5,000 more
- • Requires skilled fabrication—not all shops can do it well
- • Totally worth it if budget allows—transforms the entire kitchen
Single Waterfall: Strategic Placement
Waterfall edge on just one side—typically the side facing the main living area. Gives you the visual impact where it matters most while controlling cost.
Pro tip: Put the waterfall on the "show" side and save money on the side facing the wall or less-visible area.
Contrasting Waterfall
Top surface in one material (marble or quartz), waterfall edges in contrasting material (wood, different stone, metal). Creates incredible visual impact.
Recently completed: White marble top with walnut waterfall edges. The warmth of the wood balanced the coolness of the marble—absolutely stunning contrast.
Material Recommendations for Waterfall Edges
- • Best: Bookmatched marble or quartzite (dramatic veining creates mirror effect)
- • Great: Solid wood (walnut, white oak) for warm, natural look
- • Modern: Ultra-compact surfaces like Dekton or Neolith (thin profile, bold patterns)
- • Budget-friendly: Quality quartz with vertical veining patterns
- • Avoid: Busy patterns that don't flow well vertically, or materials that show seams badly
Function Meets Design
Integrated Appliance Islands
Modern luxury islands aren't just countertops—they're fully equipped workstations. Here are the most popular integrated appliance configurations:
Island Cooktop Station
36-48" professional-grade cooktop or range integrated into the island. Creates a chef-focused workspace while allowing the cook to face family/guests.
Must-Have Features:
- • Downdraft ventilation or overhead island hood (massive architectural element)
- • Heat-resistant surface material surrounding cooktop
- • Minimum 18" clearance on all sides of cooktop for safety
- • Pot filler faucet nearby (game-changer for pasta and stocks)
- • Storage for pots and pans directly below
Prep Sink Island
Secondary sink in the island (main sink remains at perimeter). Typically smaller—18-24" undermount bar or prep sink.
Perfect For:
- • Vegetable washing and prep
- • Filling pots without walking to main sink
- • Bar area for drink prep during parties
- • Two cooks working simultaneously
- • Keeping main sink area free for dishes
Beverage Center Island
Wine fridge, beverage cooler, ice maker, and/or coffee station integrated into one end of the island. Entertainment hub that keeps guests out of cooking zones.
Typical Configuration:
- • 24" wine fridge (dual zone for reds and whites)
- • 24" beverage cooler or undercounter refrigerator
- • Small sink for drink prep
- • Storage for glassware and bar tools
- • Electrical outlets for blender, coffee maker
Microwave Drawer Island
Microwave drawer installed in island base. Keeps countertops clear and puts the microwave at a convenient height. Becoming standard in luxury kitchens.
Placement tip: Install on the side facing living area so family/guests can grab snacks without entering the cooking zone.
Dishwasher in Island
Second dishwasher in the island (especially if you have an island sink). Panel it to match cabinetry for seamless integration.
Particularly valuable for serious entertainers—one dishwasher for prep/cooking mess, one for table settings and serving pieces.
Creating Visual Interest Through Contrast
Material Combinations That Wow
The island is the perfect place to use a different material than your perimeter countertops. This creates visual hierarchy and makes the island the star of the kitchen.
Marble Island + Quartz Perimeter
Splurge on stunning marble for the island (the showpiece), use practical quartz on perimeter where you do the real work.
Why it works: You get the wow factor where it matters most, practicality where you need it. Best of both worlds.
Wood Island + Stone Perimeter
Thick butcher block or live-edge wood slab island creates warmth, stone perimeter provides durability for cooking zones.
Why it works: Wood adds warmth and texture to balance cool stone. Beautiful contrast in modern or transitional kitchens.
Dark Island + Light Perimeter
Black or dark gray island grounds the space, white or light perimeter keeps it bright. Most popular combination currently.
Why it works: Creates visual anchor without darkening the entire kitchen. Island becomes a statement piece.
Leathered/Honed Island + Polished Perimeter
Same stone, different finishes. Textured island feels casual and hides wear, polished perimeter stays pristine.
Why it works: Subtle differentiation that adds sophistication. Especially beautiful with dark granites or soapstone.
Thick Island + Standard Perimeter
3-4" thick stone slab on island (mitered edge), standard 3cm on perimeter. Same material but the island makes a statement.
Why it works: Creates hierarchy through scale rather than color/material. Sophisticated and impressive.
Bookmatched Island + Simple Perimeter
Bookmatched dramatic stone (marble, quartzite) on island with waterfall edge, simpler stone or quartz on perimeter.
Why it works: Island becomes art piece—the kitchen's focal point. Everything else fades into supporting role.
How to Accommodate Guests Comfortably
Seating Configurations
Seating is one of the island's primary functions in luxury homes. Here's how to get it right:
Single-Side Seating (Classic)
Seating along one long side of the island. Most common configuration.
- • Space per person: 24-30" width minimum (28-30" comfortable)
- • Overhang needed: 12-15" for bar stools, 18-20" for comfortable dining chairs
- • Knee clearance: Minimum 12" under overhang
- • Typical capacity: 10-foot island = 4-5 seats comfortably
L-Shaped Seating (Casual Dining)
Seating along one long side plus one short end. Creates more of a gathering spot.
- • Best for: Corner placement islands or very large islands (12+ feet)
- • Capacity: Can seat 6-8 people comfortably
- • Challenge: The corner seat can feel tight—need minimum 36" in both directions
- • Benefit: Creates intimate conversation area
Two-Sided Seating (Peninsula Style)
Seating on two parallel long sides. Creates a true dining table feeling.
- • Requires: Island at least 5-6 feet deep to accommodate seating both sides
- • Best for: Islands that serve primarily as dining tables
- • Capacity: 8-12 people depending on length
- • Trade-off: Reduces work surface in favor of maximum seating
Stool Selection Tips
- • Height: Counter stools (24-26") for 36" islands, bar stools (28-30") for 42" islands
- • Backs: Backless for minimal visual clutter, low backs for comfort without blocking views
- • Swivel: Swivel stools are more social (people can turn to talk) but less formal
- • Quantity: Buy one or two extra—they'll get used elsewhere and you'll appreciate having them
Maximizing Every Cubic Inch
Storage Strategies for Island Efficiency
A luxury island isn't just beautiful—it's incredibly functional. Here's how to maximize storage:
Deep Drawers for Pots & Pans
Stack of 3-4 deep drawers (8-12" deep) on at least one side. Install pot and pan organizers. Soft-close is non-negotiable.
Built-In Trash & Recycling
Pull-out waste center with separate bins for trash, recycling, compost. Best placed on the side least visible to guests.
Utensil Drawers with Dividers
Shallow drawer (3-4" deep) right near the cooktop or main prep area. Custom divider systems keep everything organized.
Spice Pull-Out
Narrow pull-out (3-6" wide) next to cooktop. Tiered shelving so you can see every spice jar at once. Life-changing.
Open Shelving End Cap
One end of island with open shelves for cookbooks, decorative items, or frequently used items. Adds personality and accessibility.
Appliance Garage
Pocket door or tambour door that hides a section of countertop. Perfect for storing small appliances you use daily but don't want visible.
The Final Layer That Makes Everything Work
Lighting Your Island
Lighting can make or break your island design. It needs to be functional for food prep AND beautiful for entertaining:
Pendant Lights: The Classic Choice
Configuration: Typically 2-3 pendants over an 8-10 foot island, 3-4 over larger islands
- • Height: 30-36" above counter for functional light, 36-42" for more ambient mood lighting
- • Spacing: Evenly spaced, typically 30-36" apart
- • Size: 10-14" diameter for standard islands, 16-24" for very large islands
- • Style: Make a statement here—this is jewelry for your kitchen
Linear Suspension: Modern Drama
Single linear fixture that runs most of the island length. Very contemporary, very impactful.
Best for: Modern/contemporary kitchens with long islands (10+ feet). Creates clean lines and even illumination.
Recessed Lighting: Layered Approach
Recessed cans around the island perimeter provide ambient and task lighting. Combine with pendants for layered lighting effect.
Pro tip: Put recessed lights on separate dimmer from pendants so you can adjust layers independently.
Under-Island Lighting: The Secret Weapon
LED strip lighting under the island overhang creates a floating effect. Especially dramatic with waterfall edges.
Subtle but impactful—makes the island appear to float, adds ambiance for entertaining, and provides toe-kick lighting at night.
What We're Seeing Across California
Regional Style Variations
Island design preferences vary significantly by region. Here's what's trending in California's different luxury markets:
Silicon Valley
- • Ultra-modern, minimal aesthetic
- • Waterfall edges in sophisticated materials
- • Integrated technology (hidden outlets, charging stations)
- • Clean lines, no ornamentation
- • Large scale (10-14 feet common)
San Francisco
- • Mix of modern and traditional
- • Marble or quality quartz
- • Two-tier designs very popular
- • Statement lighting (often vintage-inspired)
- • Moderate size (8-10 feet most common)
Los Angeles
- • Bold, design-forward choices
- • Dramatic materials (exotic stone, unique woods)
- • Instagram-worthy focal points
- • Indoor-outdoor integration
- • Entertaining-focused features
Coastal (Carmel, Santa Barbara)
- • Relaxed, organic aesthetic
- • Natural wood and stone
- • Light colors (whites, soft blues, natural wood)
- • Casual seating (lower heights common)
- • Open, airy feeling
Wine Country
- • European-inspired elegance
- • Stone and wood combinations
- • Integrated wine storage
- • Substantial proportions
- • Mix of rustic and refined
Lake Tahoe
- • Mountain modern or rustic luxury
- • Thick wood slabs popular
- • Large scale (entertaining after skiing)
- • Warm materials and finishes
- • Cozy, gathering-focused design
Ready to Design Your Dream Island?
Whether you're envisioning a massive 14-foot chef's workstation or an elegant marble focal point, we'll help you design an island that's perfectly sized and styled for your home and lifestyle.
About This Guide: Design ideas and recommendations based on 200+ custom island projects designed and installed across California 2020-2025, including estates in Atherton, Pacific Heights, Beverly Hills, Lake Tahoe, and Wine Country. All measurements and specifications reflect real-world project experience.
Luxury Kitchen Resources
Luxury Kitchen Design Services
Custom islands for estate homes
Appliance Integration
Seamlessly integrate appliances into your island
Atherton Kitchen Projects
Luxury estates with stunning kitchen islands
Kitchen Design Styles
Match your island to your design aesthetic
Explore